Auto Addressing
One of the core features behind the SensorDots is the ability for devices in a chain to automatically assign themselves addresses.
When the SensorDots switch on, all devices go into a discovery state and wait until they receive an address command. All except for the first in the chain which is the master. The master is set by bridging the MST pads or connecting the MST pin to ground. The master will first assign it's own address as 0x08 and then initialise the address protocol:
This address protocol is very simple and is based on the 1wire interface. The master sends the next address to be assigned, the slave then responds with what it thinks its address is then the master will ACK with 0x01 if this is correct (or NACK with 0xFE). If there is a NACK, the master and slave will retry. If there are too many retries, then they will blink an error code.
Once the slave has got its address, it then begins this process with the next device in the chain while acting as the master.
So if you now perform an I2C scan, you should see all the devices in the chain (after a few ms depending on the number of devices).

Custom Address Ranges
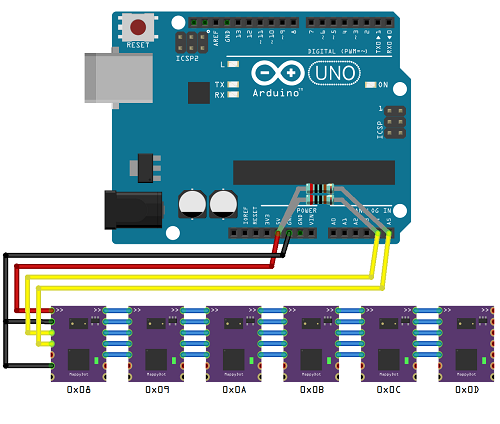
What if you want to change the address range of the devices, instead of starting at 0x08? Well, that's simple. All you need to do is connect the ADDR_IN pin of the first device in the chain to your microcontroller (as shown in the image below with the cyan wire), and initiate the addressing process with the start address you desire.

Because it is based on 1 wire, you just perform the 1wire detect presence procedure. If there is presence, then send the address, wait for the response, check that the address matches and send 0x01 for ACK or 0xfe for NACK.The pseudocode for this is as follows:
    //Perform detect presence procedure
    if (1wire_detect_presence())
    {
        //Send start address
        1wire_write_byte(address);

        if (1wire_read_byte() == address)
        {
            //Send ACK
            1wire_write_byte(0x01);

            //Return OK
            return 0;
        } else {
            //Send NACK
            1wire_write_byte(0xfe);

            //Return error; the microcontroller should restart this proceedure again
            return -1;
        }
    }
Example Arduino code for this can be found here - https://github.com/SensorDots/Testing/tree/master/new_master_addr